Creating Alerts
Users can create new alerts by clicking the Add button on the Alerts tab of the Universal Alerts Setup screen. When clicked, the Add Alert screen appears that displays the following fields:
|
Field |
Description |
|||||||||||||||||||||||||||||||||||||||||||||
|---|---|---|---|---|---|---|---|---|---|---|---|---|---|---|---|---|---|---|---|---|---|---|---|---|---|---|---|---|---|---|---|---|---|---|---|---|---|---|---|---|---|---|---|---|---|---|
|
Active Checkbox |
|
|||||||||||||||||||||||||||||||||||||||||||||
|
Start and End Dates |
|
|||||||||||||||||||||||||||||||||||||||||||||
|
Allow Properties to Deactivate |
|
|||||||||||||||||||||||||||||||||||||||||||||
|
Event Name |
|
|||||||||||||||||||||||||||||||||||||||||||||
|
Event Description |
|
|||||||||||||||||||||||||||||||||||||||||||||
|
Event Type |
This is a mandatory field that allows users to select from the following options: Reservations, Groups, Guest Profiles, Housekeeping, and Reports. |
|||||||||||||||||||||||||||||||||||||||||||||
|
Alert Trigger |
This is a mandatory single select drop-down list that allows users to select a trigger option based on the event type selected:
|
|||||||||||||||||||||||||||||||||||||||||||||
|
Priority |
Allows users to select from the following options:
|
|||||||||||||||||||||||||||||||||||||||||||||
|
Rules |
||||||||||||||||||||||||||||||||||||||||||||||
|
Match Rules |
Users can select from the following options:
A maximum of three rules can be created. Each rule can have a maximum of 5 conditions. |
|||||||||||||||||||||||||||||||||||||||||||||
|
Match Conditions |
Users can select from the following options:
Conditions contain the following:
|
|||||||||||||||||||||||||||||||||||||||||||||
|
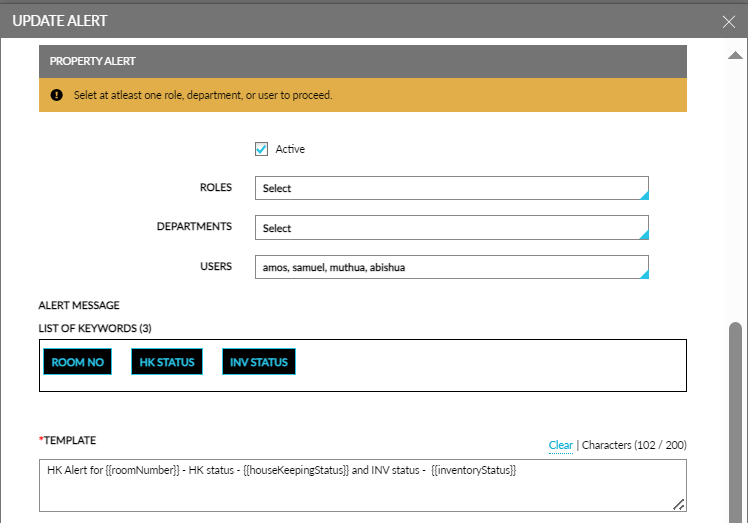
Property Alert |
Users must select values for the following fields. Only one alert is sent when a user belongs to multiple departments and has access to multiple roles. |
|||||||||||||||||||||||||||||||||||||||||||||
|
Roles |
This is a multi-select drop-down list that allows users to select the required roles. |
|||||||||||||||||||||||||||||||||||||||||||||
|
Departments |
This is a multi-select drop-down list that allows users to select the required departments. |
|||||||||||||||||||||||||||||||||||||||||||||
|
Users |
This is a multi-select drop-down list that allows users to select the required users. |
|||||||||||||||||||||||||||||||||||||||||||||
|
Alert Message |
Users can select the following keywords for the alert message:
|
|||||||||||||||||||||||||||||||||||||||||||||
|
Template |
This is mandatory field that allows users to enter a maximum of 200 characters including alphanumeric and special characters. When users enter more than 200 characters, the following message is displayed: Maximum length exceeded. |
|||||||||||||||||||||||||||||||||||||||||||||
|
Reservation Alert |
||||||||||||||||||||||||||||||||||||||||||||||
|
Active Checkbox |
|
|||||||||||||||||||||||||||||||||||||||||||||
|
Alert Message |
||||||||||||||||||||||||||||||||||||||||||||||
|
List of Keywords |
Users can select the following keywords for the alert message:
|
|||||||||||||||||||||||||||||||||||||||||||||
|
Template |
This is mandatory field that allows users to enter a maximum of 200 characters including alphanumeric and special characters. When users enter more than 200 characters, the following message is displayed: Maximum length exceeded. |
|||||||||||||||||||||||||||||||||||||||||||||
|
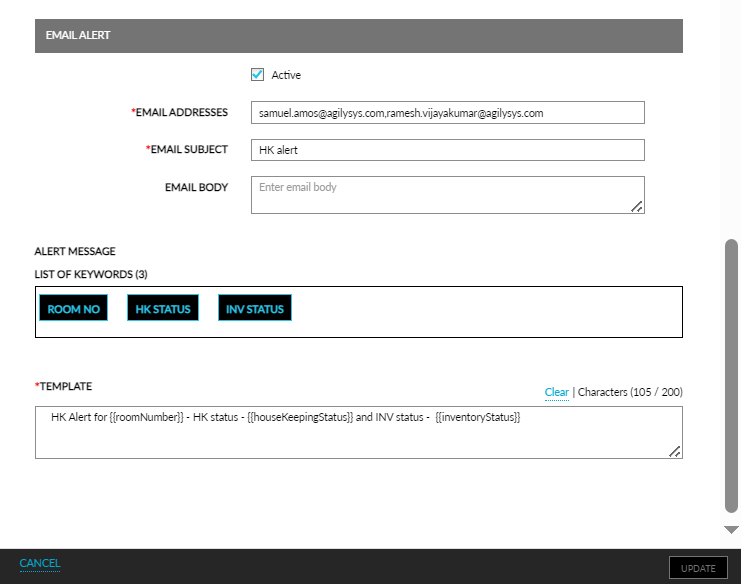
Email Alert |
If multiple alerts are triggered for the event, they will be grouped and listed in the same email. For example, a list of guest birthdays overlapping the reservation being alerted on the day of arrival will be sent as one email with the alerts listed within. |
|||||||||||||||||||||||||||||||||||||||||||||
|
Active Checkbox |
|
|||||||||||||||||||||||||||||||||||||||||||||
|
Email Address |
This is a mandatory field that allows users to enter multiple email addresses separated by a comma. |
|||||||||||||||||||||||||||||||||||||||||||||
|
Email Body |
|
|||||||||||||||||||||||||||||||||||||||||||||
|
Alert Message |
||||||||||||||||||||||||||||||||||||||||||||||
|
List of Keywords |
Users can select the following keywords for the alert message:
|
|||||||||||||||||||||||||||||||||||||||||||||
|
Template |
This is mandatory field that allows users to enter a maximum of 200 characters including alphanumeric and special characters. When users enter more than 200 characters, the following message is displayed: Maximum length exceeded. |
|||||||||||||||||||||||||||||||||||||||||||||
|
Restrictions |
||||||||||||||||||||||||||||||||||||||||||||||
|
Allowed Days |
|
|||||||||||||||||||||||||||||||||||||||||||||
|
Allowed Time Range |
Users can select the allowed time range for the restrictions in the From and To fields. |
|||||||||||||||||||||||||||||||||||||||||||||

When users select the Guests/Age Category Count field in a rule, a new condition in the rule will be created automatically with the field as Age Category. The Guests/Age Category Count fields must always be chosen as a pair. Once selected, users must select the age category for which the count needs to be checked in this rule. Only one pair of them is allowed in a rule. Once they are selected in a rule, user should not be able to select them again in the same rule.
When Custom Field Data is selected in a rule, a new rule will be created automatically with the field as Custom Field. Users must select the custom field for which the data needs to be checked in this rule. Custom Field Data and Custom Field will always come in pairs if Custom Field Data is selected. Only one pair of them is allowed in a rule. Once they are selected in a rule, user should not be able to select them again in the same rule.
When users select Key Revoked or Discrepant Room fields, no operator value needs to be selected further.
For the following fields, the Operator value should be selected as In so that users can select the required options in the Value column:
-
Payment Method
-
Age Category
-
Pets
-
Reservation Status
-
Group Status
-
Custom Field
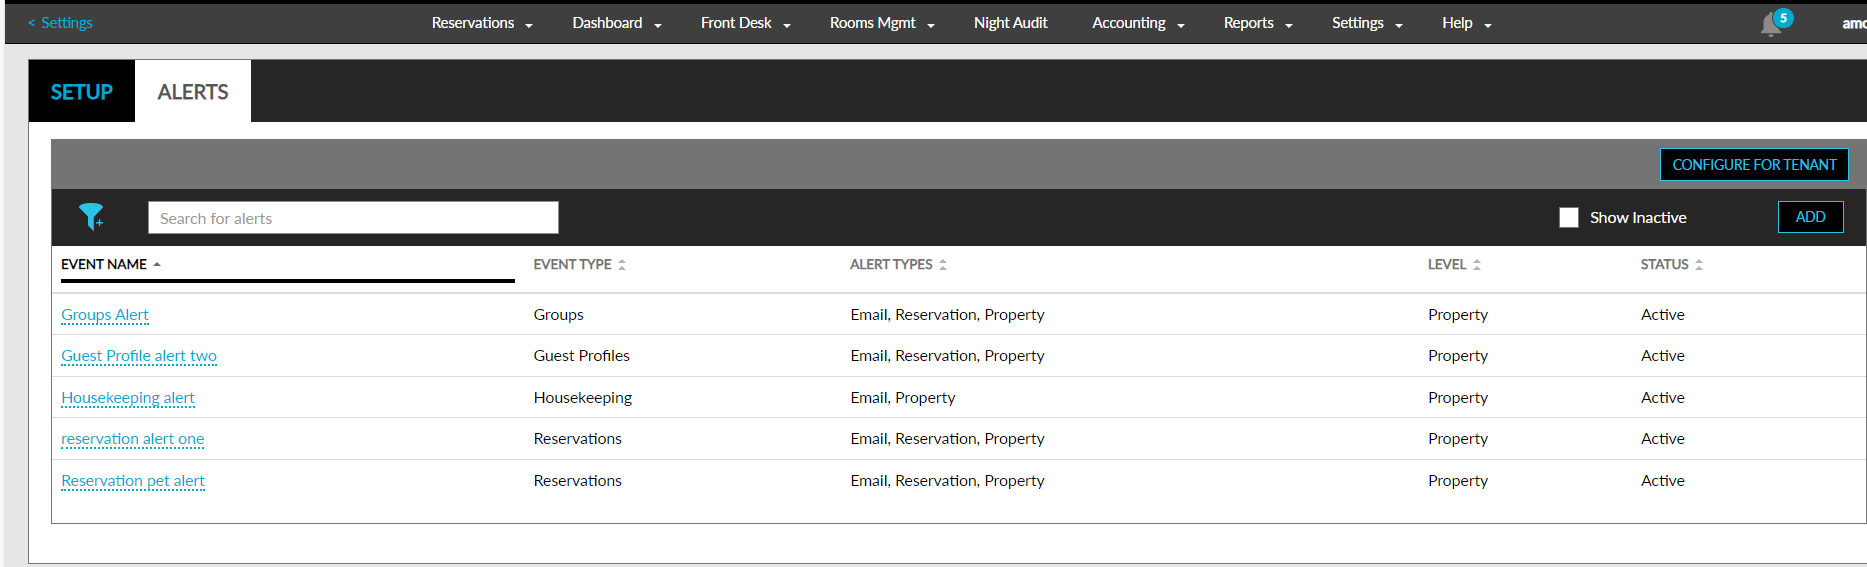
Users can save the alerts by clicking the Save button. By default, the alerts are configured at the property level. Users can configure alerts at the customer level by clicking the Configure for Tenant button.
The following columns are displayed on the Alerts tab for the created alerts:
|
Column |
Description |
|---|---|
|
Event Name |
Displays the name of the event. |
|
Event Type |
Displays the event type, such as, reservations, groups. |
|
Alert Types |
Displays the type of the alert, such as, property, reservation, email. |
|
Level |
Displays if the alert was created at the tenant or property level. |
|
Status |
Displays if the status of the alert is active or inactive. |
By default, only the active alerts are listed sorted alphabetically based on the event name. The Show Inactive checkbox must be enabled to display the inactive records. Users can sort the records in all the columns. The records can be filtered based on the following criteria:
-
Event Type: Users can choose from the following event types:
-
Reservations
-
Groups
-
Guest Profiles
-
Housekeeping
-
Reports
-
-
Alert Type: Users can choose from the following alert types:
-
Reservation
-
Property
-
Email
-
-
Level: Users can choose from the following levels:
-
Tenant
-
Property
-
-
Status: Users can choose from the following status
-
Active
-
Inactive
-
Users can search records using the event names. The details of the alerts can be modified by clicking the event name hyperlink. When clicked, the Update Alerts screen appears that allows users to modify the required details.